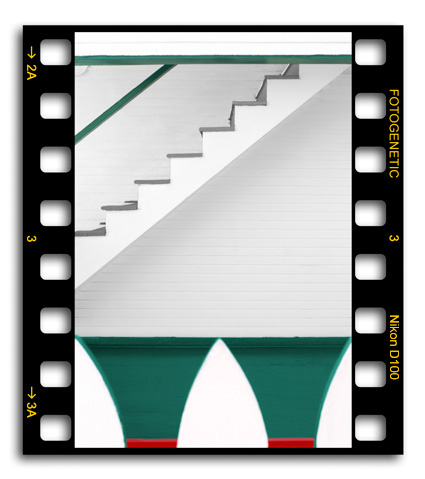
Sad day for me… my beloved camera has succumbed to digital morbidity after 5 years of faithful service.  After 3 portfolios, 2 magazine covers, 1 calendar cover and countless memories, it has moved on to a better world, the eBay “For Parts or Repair” list.

“Nickie D” (yes, I name my cameras), you were there with me through the the thick and the thin.  From the peak of Mount Fuji to the dark foc’sles of warships beneath the stars of the Milky Way; from thunderstorms in distant seas to sandstorms in the deserts of the Middle East; you’ve seen everything my eyes have.  You were more than just my camera, you were my best friend!  Now you are a paperweight.  In your tribute, I post the best of “our” photos:

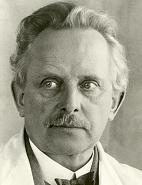
Oskar Barnack (1879-1936)


Oskar Barnack and the 3:2 Aspect Ratio

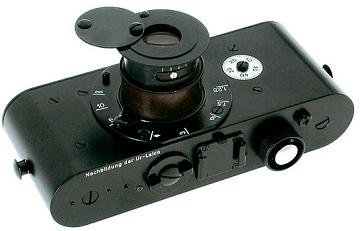
The origin of the aspect ratio of 35mm film can be traced to Oskar Barnack, an employee of Leitz Camera (Leica) in Germany. At the turn of the century, film for still photography came in the form of large plates, which were required in order to make contact prints of the same size (usually 8×10 inches). Driven by a vision of “small negatives–large images”, Barnack revolutionized photography by eliminating the need for large photographic plates and the clumsy camera bodies they required. He demonstrated that high quality prints could be achieved by enlarging images from small negatives exposed on the same 35mm gauge film used in cinema. He created the standard 35mm still frame (24x36mm) simply by merging two 35mm cinema frames (18x24mm). This resulted in a 3:2 aspect ratio compared to the standard 4:3 aspect ratio of early cinema. Barnack then created the first 35mm camera ever, dubbed the “Ur-Leica”, in 1914. After WWI, Barnack convinced his boss, Ernest Leitz II, to begin production of 35mm cameras. In 1925, Leitz Camera released the first Leica and the rest is history.
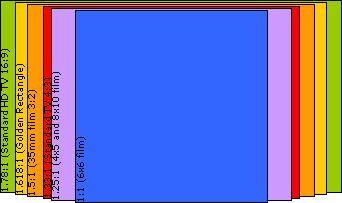
How has the 3:2 aspect ratio of 35mm film lasted for nearly 100 years as the dominant ratio in still photography? There are many other popular formats in still photography, including 8×10, 4×5, 6×6, and recently 4×3, but there is something special about the 3:2 aspect ratio of 35mm film which has allowed it to endure, and I believe it has nothing to do with how easy it is to find frames for or the availability of correctly sized paper stock for prints or how flexible the format is for cropping, advantages often associated with other aspect ratios.  The 3:2 aspect ratio has every logical reason going against it, except that it happens to have the closest proportions to the Golden Rectangle of any other major film format in still photography which, I contend, gives it the potential to present the most aesthetically pleasing composition of all major film formats.

Figure 1: Comparison of various film formats
What Is the Golden Rectangle?

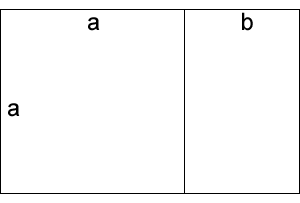
The Golden Rectangle is defined as a rectangle that can be partioned into a square and a smaller rectangle which has the same aspect ratio of the original rectangle. In Figure 2, we see such a rectangle. In this example, the length of the smaller rectangle divided by its width is equal to the length of the larger rectangle divided by its width, i.e., a ÷ b = (a + b) ÷ a. The ratio of the larger side of each rectangle to the smaller side is known as the Golden Ratio. Mathematically, this works out to be about 1.62:1, or 3.2:2 compared to the 3:2 aspect ratio of 35mm film.

Figure 2: The Golden Rectangle
The Golden Rectangle in Nature

The Golden Rectangle and Golden Ratio appear in some very interesting places. For example, in Fibonacci numbers, a sequence of numbers where each new number is the sum of the previous two numbers (1, 1, 2, 3, 5, 8, 13 . . .), the ratio of consecutive numbers increasingly approaches the Golden Ratio. In Figure 3, we see a graphical relationship between Fibonacci numbers and the Golden Rectangle. The Fibonacci numbers are closely related to exponential growth, such as the reproduction of rabbits. They are also found in plants where many tend to have a Fibonacci number of petals or leaves.

Figure 3: Relationship between the Fibonacci sequence and the Golden Rectangle

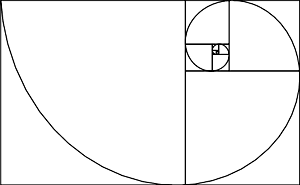
Another interesting place the Golden Rectangle appears is in spirals. Successive points dividing a golden rectangle into squares lie on a logarithmic spiral, also known as the “Spira Mirabilis”. See Figure 4. Coincidentally, spirals such as these are found throughout nature, such as in the contours of Nautilus shells.

Figure 4: The Golden Rectangle and Spira Mirabilis
The Golden Rectangle in Art

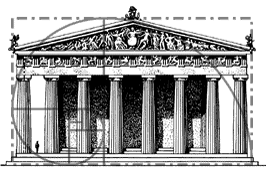
The Golden Rectangle is believed to have been first constructed by Pythagorus in the 6th Century B.C. It is said to be one of the most visually pleasing of all geometric forms. Archeologists have found countless examples of it in the facades of ancient Greek architecture. In Figure 5, we see how the Parthenon in Athens was built to the dimensions of the Golden Rectangle.

Figure 5: The Parthenon
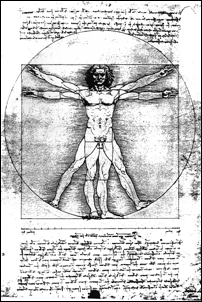
In Figure 6, we also see how Leonardo da Vinci applied the Golden Rectangle to the proportions of the human body. In this example, the height of the person was divided into two segments, the dividing point being the person’s navel. Leonardo took the distance from the soles of the feet to the navel, then divided by the distance from the navel to the top of the head and found that it was equal to the Golden Mean, or as he would call it, the Divine Proportion.

Figure 6: Leonardo da Vinci’s study of the human body
35mm Film and the Golden Rectangle (Part 2) »

Henri Cartier-Bresson

Henri Cartier-Bresson


The Golden Rectangle in Photography

And now we return, full circle, to how the Golden Rectangle relates to 35mm photography. We cannot speak further on this subject without mentioning Henri Cartier-Bresson, arguably the most imporant photographer of the 20th century. Before he ever became a photographer however, Cartier-Bresson studied painting under the Cubist painter, Andre Lhote. Beginning in 1928, he underwent the visual training which would eventually enable him to capture on film what he would later call, “Images a la Sauvette,” better known as “The Decisive Moment”. Indeed, before Lhote passed away, he commented on Cartier-Bresson’s photography, “Everything comes from your training as a painter”.

So how does Cartier-Bresson’s early background as a painter relate to the significance of the 3:2 aspect ratio? Interestingly, Cartier-Bresson never cropped any of his images. Every single photograph he displayed was a full 35mm frame just as it came from one of his Leicas. Cartier-Bresson would file out the negative carriers to specifically show that the print was an uncropped, full-frame enlargement composed entirely in the camera. He wrote. “In order to ‘give a meaning’ to the world, one has to feel oneself involved in what he frames through the viewfinder. This attitude requires concentration, a discipline of mind, sensitivity, and a sense of geometry.” The geometry Cartier-Bresson speaks of is that of the 35mm frame. Notable war photographer, Don McCullin, said of Cartier-Bresson, “I think I speak for every photographer and especially Magnum photographers, when I say that Henri really introduced the concept of perfect composition into our thinking. He was the first to teach us to compose within the specific shape of the 35mm frame and to utilize the very nature of that camera and format.”

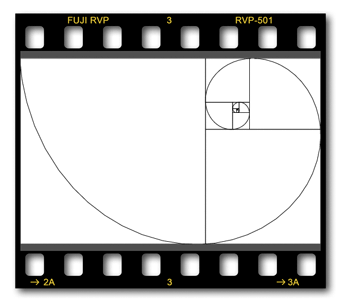
But why such devotedness to the seemingly arbitrary 3:2 aspect ratio? In Figure 7, we see just how close the aspect ratio of 35mm film is to the Golden Rectangle.

Figure 7: 35mm film and the Golden Rectangle

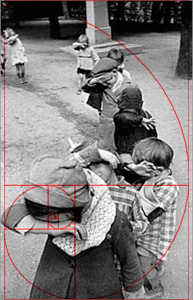
Although efforts to try and analyze Cartier-Bresson’s genius would probably be pointless, by looking at several of Bresson’s photographs, we can clearly see the close relationship between his compositions and the Golden Rectangle. This is most likely a carryover from his training as a painter, as his mentor Lhote suggested. The amazing thing is that, unlike a painter who can create his compositions at his leisure, Cartier-Bresson had to discover them in the unpredictable and relentless tempo of everyday life. We see, in Figure 8, how the line of children in one of Cartier-Bresson’s photographs closely follows a logarithmic spiral.

Figure 8:

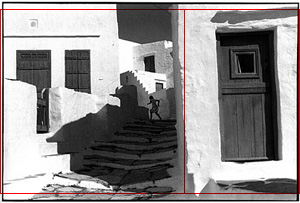
In Figure 9, we see how Cartier-Bresson used the proportions of the Golden Rectangle to form his composition.

Figure 9:

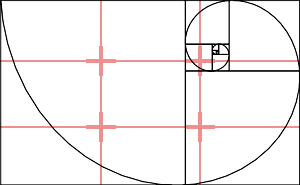
Interestingly, most people would probably say that the photo above follows the Rule of Thirds. However, I would venture to say that the Rule of Thirds is merely a specific application or simplification of the Golden Rectangle. In Figure 10, we see an overlay of the Rule of Thirds over the Golden Rectangle. In this overlay, the four points located at the intersections of the lines dividing the image into thirds, considered the sweet spots of composition, fall approximately where the Golden Rectangle converges if allowed to repeat inside itself. Perhaps the Rule of Thirds actually has its origins in the Golden Rectangle.

Figure 10: Overlay of the Rule of Thirds over the Golden Rectangle

So, there you have it, a compelling argument against the idea that the 3:2 aspect ratio is simply an arbitrary standard some manufacturer decided on years ago for no valid reason. I leave you with my own attempt at applying the Golden Rectangle to photography.

Welcome to WordPress.com. This is your first post. Edit or delete it and start blogging!

Disclaimer

This is not an in-depth article on Modulation Transfer Frequency (MTF) theory. To learn about MTF theory, take a look at Norman Koren’s excellent article here. Instead, this article only provides the basics of what you need to know regarding MTF charts. More importantly, it provides a method for choosing the best lens to fulfill a broad range of needs.

Why Lenses With Good Reviews Disappoint People

When choosing a lens, most photographers are not aware of all of the considerations to help them make a well informed decision.  Most do not thoroughly consider what they will be using the lens for, at least not as thoroughly as this article proposes. Many simply want a general lens, a “sweeper”, that they can glue to their cameras and forget about. After looking at several subjective lens evaluations and perhaps even comparing MTF ratings, they finally purchase a lens, only to be surprised that their photos are not as sharp as they expected them to be despite the lens having good reviews or a decent MTF rating. How could this happen?

Subjective Lens Reviews Are Subjective

It is simply not enough to read subjective lens reviews. The reviewer may have a completely different use for the lens than you. For example, in Ken Rockwell’s website, he has much praise about the sharpness of the AF Nikkor 28-85mm f/3.5-4.5. If you look at the technical data of that lens, it is a lot sharper than you might expect for its price, especially at f/8. However, when the aperture is wide open, only the center remains adequately sharp. If you are a landscape photographer, you might consider the lens to be sharp because when shooting landscapes, you are more likely to use the lens at a wide angle, with the aperture stopped down to f/8 or smaller. But if you were an outdoor portrait photographer and wanted to place your subject somewhere other than the center of the frame against a creamy, out-of-focus background, the same lens would not appear to be sharp. So, depending upon your style of photography, you may come up with a completely different conclusion about the same lens.

MTF Ratings Are Misleading

To me, subjective evaluations are great for getting a general idea about build quality, how a lens handles, and its flaring characteristics, but for determining sharpness, there is nothing more objective than understanding the MTF data of a lens. But even MTF ratings (as opposed to MTF charts) can be deceiving. First of all, MTF data does not take into account sample variation. Although a lens may have a good MTF rating, the particular lens you purchase may not be as sharp due to quality assurance issues at the factory. Additionally, MTF ratings only provide an overall weighted average of lens performance. You need to look at the entire MTF chart, not just the overall rating. For example, the Nikkor AF 24mm f/2.8 has an overall MTF rating of 3.7. This is slightly higher than the 20mm Nikkor, which has a rating of 3.5. However, by looking at the entire chart, you will see that while the 24mm Nikkor is sharper in the center than the 20mm, at the corners, the 20mm Nikkor is slightly sharper. Depending on your photography style, you may prefer the more even sharpness of the 20mm to the center sharpness of the 24mm.

Figure 1: AF Nikkor 24mm f/2.8 vs. AF Nikkor 20mm f/2.8

The Bottom Line

The bottom line is that you need to first understand what you intend to use the lens for. Once you narrow down your choices, you need to then look at the entire MTF chart for those lenses, not just the overall MTF ratings. The steps outlined in the following posts will hopefully help you to make a more informed decision when purchasing a lens.